You can type "create an Ubuntu VM with my SSH key" into Cursor and get back an address you can SSH into. NodeRings runs a hosted MCP server at https://mcp.noderings.com/mcp. Cursor signs in to your account through it, and from then on the assistant can search plans, create a VM, start it, and delete it. The VM is usage-based. It bills by the hour from credit you put on the account first.
People joining do the same four things before the first prompt. An account, a card, credit on that account, and an SSH key. Then they connect Cursor, ask for the machine, use it, and delete it when they are done. The steps below go in that order. If the marketplace itself is new to you, How NodeRings works covers who sells the machines.
How Cursor signs in and creates the VM
The connection is OAuth, the same kind of sign-in as "Log in with GitHub". Cursor first connects to the MCP server with no token. The server answers 401 and tells Cursor where NodeRings signs people in. Cursor opens your browser on that page with the public client id noderings-mcp and a PKCE challenge, which ties the sign-in to this one Cursor session. You log in, pick the organization, and approve. Cursor gets back an access token for that organization, limited to the mcp:tools scope, plus a refresh token so it can renew the session without sending you back to the browser.
Your password goes to the NodeRings sign-in page and stops there. Cursor holds the token.
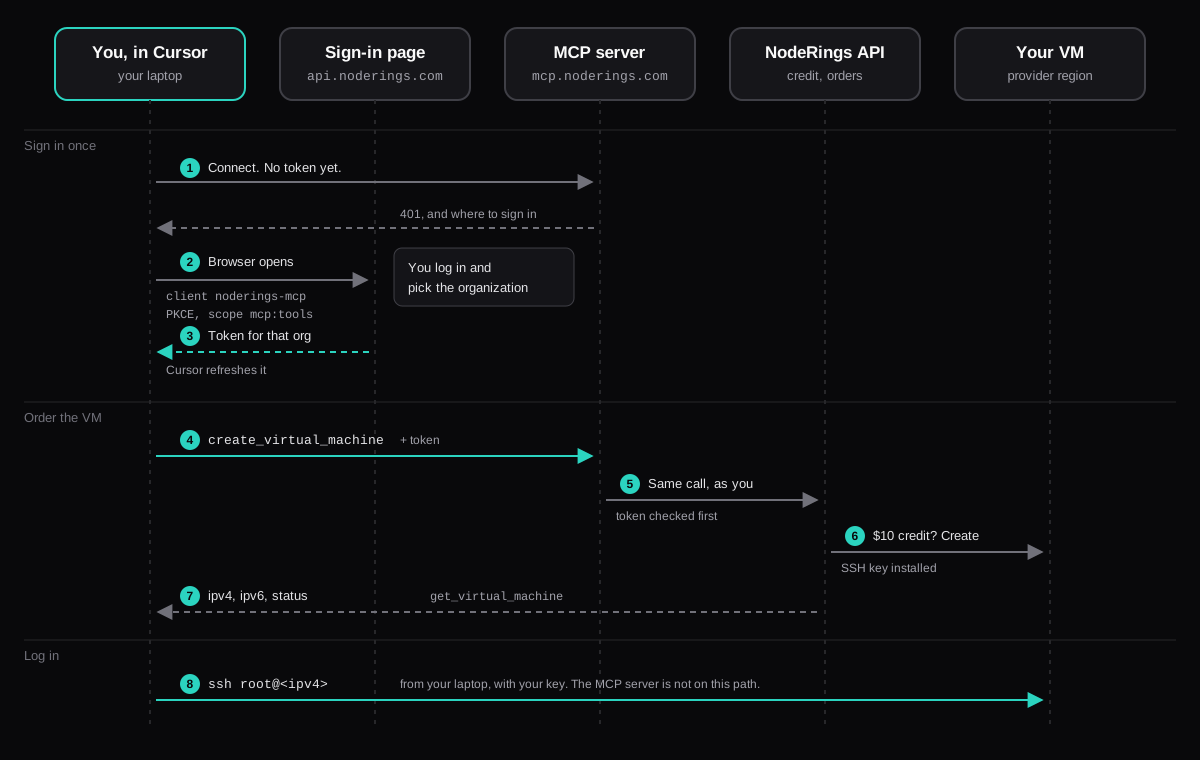
Every tool call after that carries the token. When the assistant calls create_virtual_machine, the MCP server checks the token against the NodeRings signing keys and makes the same call to the NodeRings API as you. The API applies the rules the console applies. It checks the credit balance, creates the VM in the provider's region, and installs the SSH key you picked. The address comes back on get_virtual_machine.
The last arrow skips the MCP server. You SSH to the VM from your own machine with your own key. The server has no tool that opens a shell, so it has no way into the guest and never sees the private key.
The token belongs to one organization. If you switch organizations in the console, sign in again from Cursor.
1. Sign up
New accounts start at sign up. Confirm the email. The organization you create to buy plans is a client organization. A provider organization lists machines for sale, and the marketplace tools stay off it. If you already have a client organization, use that one.
2. Add a payment method
Usage-based plans draw from prepaid credit, and the card is how you buy that credit. Open Payment methods and add one. The MCP server has no billing tool, so the assistant leaves the card where you put it.
3. Put at least $15 of credit on the account
Open Credits and buy a balance. The provision check wants at least $10 of available credit. Ten dollars gets the VM created, and the hourly charge comes out of the same balance. Put $15 on it, or more if the machine is going to stay up. The first hours come out of whatever is left above that $10.
A short balance comes back as "Insufficient prepaid credits" and names the minimum. Top up on the Credits page, then ask again.
4. Upload an SSH key before you ask
create_virtual_machine takes SSH key ids. A password is not one of the fields. Generate a key on your machine if you need one, and add the public half under SSH Keys. A passphrase stays in your terminal. Unlock it there with ssh-add when you are ready to connect. The assistant can list the id, the name, and the fingerprint of each key.
5. Connect Cursor to the NodeRings MCP server
Add NodeRings to Cursor installs a server named noderings with the URL and the client id. Cursor asks you to confirm, then opens the sign-in from the diagram. Use the client organization that holds the credit and the key.
To add it by hand, paste this into Cursor's MCP settings:
{
  "mcpServers": {
    "noderings": {
      "url": "https://mcp.noderings.com/mcp",
      "auth": {
        "CLIENT_ID": "noderings-mcp"
      }
    }
  }
}
The URL alone fails at sign-in, because Cursor has to send the client id. The MCP guide lists every tool.
6. Ask Cursor to create the VM
Ask for it in plain language:
Find a small usage-based plan, Ubuntu 24.04, and create a VM with my SSH key. When it has an address, tell me the IPv4.Under that sentence the tools are fixed. list_marketplace_offerings returns the plan id and the region id. list_distros returns DISTRO_UBUNTU_24_04. list_ssh_keys returns the key id. create_virtual_machine sends those, plus a hostname. get_virtual_machine is where ipv4 and ipv6 show up. A VM that is still provisioning comes back with those fields empty. If the status is created and the address is still blank, ask it to start the VM.
We ordered a 1 vCPU usage plan in Ashburn this way. The address came back on get_virtual_machine, and the login was from the laptop:
ssh root@<ipv4>On a standard image the key you selected is installed for root. A custom cloud-init profile can use a different user. The API has no field for that user, so the tool leaves the login name to you.
One vCPU and 1 GB is enough to try the flow. If you are sizing for a real workload, What fits on a 2 GB VPS has idle memory for 19 apps.
7. Use the VM, then delete it
Once you are on the guest, it is a normal machine. The assistant can still start, stop, and reboot it. The shell is the SSH session you opened.
When you are finished, name the VM and tell the assistant to delete that one. delete_virtual_machine removes the VM, its snapshots, and its backups, and releases the addresses. If it was the last VM on the subscription, the subscription is cancelled and a final hourly charge is recorded against the credit balance. A second delete of the same id returns not found.
Try it
From no account to a shell is the four setup steps and one sentence in Cursor. Create an account, put $15 of credit on it, upload a key, and add NodeRings to Cursor. If you would rather click than chat, the console has the same order on Create virtual machine. The hourly charge stops when you delete the VM.